A Trigger allows you as the administrator to receive automated notifications from NestForms when a response or responses have been received into your account. This can be by email or as even updates and additions to some of the popular third party cloud platforms (Google Drive, Dropbox, Microsoft OneDrive).
Some of the Trigger features described below are only available based on the subscription plan you have chosen, this is explained in the table at the end of the page.
Depending on your subscription, you can choose different kinds of trigger types.
For instance, you can choose options such as receiving a summary email for all responses received during the day. You can also save a new response into your Google Drive account as soon as it is created. There are many other options you can choose to suit your requirements.
Create a new trigger #
In order to assign a trigger to one of your forms, just click on Triggers in the submenu on your Dashboard. This will bring you to the Trigger List page, from here you can edit your existing triggers or add your first trigger by clicking on the Add Trigger button.
When you have clicked on the Add Trigger button, you can create your trigger by following the steps below:
Give a name to the new Trigger simply by clicking into and editing the New Trigger title box.
Select the Trigger type from the dropdown menu provided (Webhook, Email, external storage etc. explained below).
Select the Trigger frequency from the dropdown (Instant, Hourly, Daily, etc...).
Action #
There are five actions to choose from:

Receive response - Action performed upon receiving responses.
Approve response - Action performed when a response is approved.
Reject response - Action performed when a response is rejected.
Delete response - Action performed when a response is deleted.
Scheduled tasks - Action performed based on the specific time schedule.
Frequency #
Each Trigger reports every response only once (e.g. Weekly report Responses finished within the last week).
Daily - The most often used trigger - you can just get a notification on how many forms were filled during the previous day (Available to all paid subscriptions). You can specify the exact time you prefer the trigger to run.
Weekly - Similar to daily, except sent once a week. You can also set the time for trigger activation (Available to all paid subscriptions).
Fortnightly - Similar to daily, except sent every two weeks. You can also set the time for trigger activation (Available to all paid subscriptions).
Monthly - Similar to daily, except sent every month. You can also set the time for trigger activation. (Available to all paid subscriptions).
Hourly - Similar notification to daily, except it is sent on the hour. Which allows you to review these responses within the same day if required (Available to Advanced & Premium users only).
Instant - You receive one notification per response to your form in real time (Available to Premium users or as a separate paid module).
Associate the specific forms #
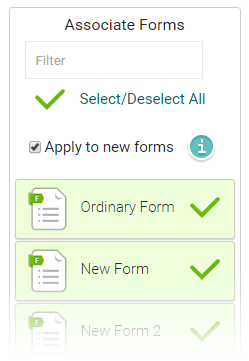 |
You can select which forms your trigger is associated with. You can also easily set all forms by clicking to Select/Deselect All. Note: The Trigger Rules and Trigger Email answers will be created with no rules and no email answers when the form is added automatically. |
Understanding Trigger Types #
Trigger type defines the automation action that will be processed. There are multiple Trigger types that are at your disposal based on your subscription:
- Webhook
- Google Drive
- Dropbox
- Microsoft OneDrive
- Microsoft SharePoint
- FTP
- Autoapprove
- Responder Notification - Sends push notifications to the mobile app.
- Delete Responses – Automatically deletes responses based on age and selected forms.
Trigger type: Responder Notification #
You can send automatic push notifications to responders’ devices, reminding them to complete assigned forms at specific times.

Select the form you wish to work with (you can select multiple forms if required) from your forms list on the right hand side.
When the scheduled time arrives, NestForms sends a push notification to any responders that have the form shared with them.
Trigger type: Delete Responses #
This trigger automatically removes form responses that are no longer required. You can define how often the trigger runs using the Frequency field, set when it will run next using Next activation date, and choose how old responses must be before deletion using Delete after (for example, 6 months or 12 months).
Using deletion triggers removes the need to manually delete old responses and helps keep storage under control.
If you do not need to retain historical responses and want to keep storage usage to a minimum, deletion triggers can be applied to run automatically in the background.


Trigger type: Email #
A good use of an email trigger is when you wish to receive email confirmation of when a job has been completed, for example from a builders punch list, a to-do list or other checklist form.
You could also set up a trigger for when a certain temperature has been reached or exceeded on a gauge after an engineers inspection report.
You can choose between Instant, Daily, Hourly, Weekly, Fortnightly and Monthly updates. You will only receive notification emails when there are new responses.
You should also note that you can send a trigger email to someone who doesn't have a NestForms account. To create this type of Trigger email, use the Question option in the Email To/Email CC dropdown.
Depending on your subscription, there are different options available in terms of the Trigger and webhook frequency. (For more info see Trigger-options-subscription-summary).
Non Premium subscribers can also add instant triggers using a separate paid module.
Email To and the Email CC
By choosing Instant email triggers you are provided with a dropdown menu with the following options:
Use email - this is the default option allowing you to manually enter a receiving email address for the Trigger for the Email To (or Email CC if a copy is required). If you wish you can add additional email CC addresses at this point. Use the Add more button.
Responder - Sends an email to the user that was logged into the app entering the data.
Question - Sends an email to the email address entered into the Response.
There are some steps you should take when setting up your trigger:
- First, make sure you used an Text component within your form and set it by clicking on the Email button.
- Then you can edit the trigger, set the type as Email and Frequency to Instant.
- Choose the Question option from one of the Email To or Email CC dropdowns.
- You will then see red warnings for the forms on the right hand side.
- Mouseover the form with the red warning and click to the trigger icon and the popup will open.
- In the Form options popup, go to the Email tab and choose the desired field in the Email Field section.
- Don’t forget to confirm your settings in the popup and also to update your trigger.
Email verification
When using the email trigger type, you should make sure you verify the email address that is going to receive the notifications when setting up your trigger, you can do this by clicking on the Send email button on the right of the email address box, if you have not done so, you will be warned the trigger is inactive until the email has been verified.
Email message
There is already a pre-written email message that is sent with the trigger notifications, you can see it when editing your new trigger. This email should cover your notification requirements as a default. If required, you can edit this mail if you wish to add some more customised information into the email.
You will also see an Email Subject field where you can enter a title for the email.
Underneath this you will see another field for entering the Sender name.
Message
This next section is where you can modify the basic details that will be received within the email notifications. You can change how the email appears, bold, italics, paragraphs etc as well as using placeholders to identify the form name and response.
Custom email content
This is a more advanced section that will allow you to add enhanced customisations to the email content such as adding images, links, tables and many other features. This section should only be used by users familiar with advanced email formatting and/or HTML skills. You can find out more on the Custom email content help page.
Enclosures
This allows you to attach the response to the email in whichever enclosure format you prefer.
The Active/Inactive radio buttons denote whether the trigger is on or off.
When completed click on the Update button to save the trigger.

Trigger type: Webhook #
Informs an external web application to process the data or to perform some additional action. From experience this is mostly used with instant triggers automatically calling whenever a response reaches the server.
You can set the frequency to Instant, Hourly, Daily, Weekly, Fortnightly and Monthly.
In the Service field you will see a dropdown where you can choose NestForms or Boberdoo.
Type of Body - available NestForms style Service is selected - defines what type the data will be submitted:
- JSON - all data will be sent in JSON format. Enclosures are sent as base64 encoded directly within the JSON.
- HTTP Post - data will be encoded as standard POST values. Enclosure files are submitted as multipart/form-data.
Enclosures - defines what files will be submitted.
It’s also possible to join the webhook to the NestForms application, so that your website can perform more actions afterwards.
Trigger validation
When a Trigger is created or its endpoint is modified, an activation request is sent to the endpoint URL to enable the Trigger.
This request contains application/www-urlencoded-data data (or JSON encoded data based on the webhook type) with a confirmation URL.
You should log this request to some form of log file, which will allow you to retrieve/see the confirmation URL.
You need to visit this enclosed confirmation URL in your browser in order for you to receive any trigger data.
This action informs NestForms that you have access to this domain and confirms you wish to receive this data.
The Active/Inactive radio buttons denote whether the trigger is on or off.
When completed click on the Update button to save the trigger.
The Webhook trigger is only available on the Premium plan or as a separate paid module.
We also integrate with Boberdoo using the webhook.
For Advanced and Premium users, we also provide triggers to send your data to the following cloud storage options: Google Drive, Dropbox, Microsoft OneDrive and SharePoint.
When you want to use the trigger for any of these cloud storage options, just try the first export manually (on the reports page). This will then set up communication with your third party provider. Then there are no special settings needed in triggers if you create one later.

Trigger type: Google Drive & Sheets #
NestForms Will automatically sync all new responses within your designated Google Drive & Google Sheets account. Please remember that all responses are sent (including pending responses)
You can select the email frequency for instant, hourly, daily, weekly, fortnightly and monthly.
For daily, weekly, fortnightly and monthly the Next activation box will appear with a dropdown calendar where you can set the actual date and time to process the next trigger.
There is a field for attaching an enclosure. The most common enclosures include incremental spreadsheet updates and media files, but you can also choose PDFs, Word documents, Excel etc.
The Active/Inactive radio buttons denote whether the trigger is on or off.
When completed click on the Update button to save the trigger.

Trigger type: Dropbox #
Will automatically sync all new incoming files with your designated Dropbox Account
Please remember that all responses are sent (including pending responses).
You can select the email frequency for instant, hourly, daily, weekly, fortnightly and monthly.
For daily, weekly, fortnightly and monthly the Next activation box will appear with a dropdown calendar where you can set the actual date and time to process the next trigger.
The Active/Inactive radio buttons denote whether the trigger is on or off.
When completed click on the Update button to save the trigger.
Trigger type: Microsoft Excel Office 365, OneDrive or SharePoint #
Will automatically sync all new responses within your designated Excel file within your Microsoft OneDrive or SharePoint account. Please remember that all responses are exported (including pending responses).
You can select the email frequency for instant, hourly, daily, weekly, fortnightly and monthly.
For daily, weekly, fortnightly and monthly the Next activation box will appear with a dropdown calendar where you can set the actual date and time to process the next trigger.
There is a field for attaching an enclosure. The most common enclosures include:
- Incremental spreadsheet updates (which will keep adding new responses as rows into the same Google Sheet).
- Multi-Row If you have <Multi-Row Excel> setup, you can specify which continuous excel you want to export in Edit trigger options (when mouseover the form on the right hand side in the Data export tab.
- Multiple PDFs and Word documents (which will create a file for each Response),
- Single PDF, Excel (which will create one file every day - as a daily trigger).
- Media files - every image from the response will be exported as a separated file in the folder based on the Response.
The Active/Inactive radio buttons denote whether the trigger is on or off.
When completed click on the Update button to save the trigger.
Microsoft OneDrive or SharePoint files
Will automatically sync all new incoming files with your designated Microsoft OneDrive or SharePoint Account. Please remember that all responses are exported (including pending responses).
You can select the email frequency for instant, hourly, daily, weekly, fortnightly and monthly.
For daily, weekly, fortnightly and monthly the Next activation box will appear with a dropdown calendar where you can set the actual date and time to process the next trigger.
There is a field for attaching an enclosure. The most common enclosures include incremental spreadsheet updates and media files, but you can also choose PDFs, Word documents, Excel etc.
The Active/Inactive radio buttons denote whether the trigger is on or off.
When completed click on the Update button to save the trigger.
Trigger type: FTP / sFTP #
Will automatically export all new responses into your private FTP or sFTP account. This will allow you to have a copy of all data you have collected. This can include Word documents, single and multi PDF documents, Excel sheets or all files and images collected by your colleagues. Please remember that all responses are sent (including pending responses). Available to Advanced & Premium users only or as a separate paid module.
The FTP link is the URL or endpoint that you will use in order to receive the form data. The directory for each form will be created at that location.
You can select the email frequency for instant, hourly, daily, weekly, fortnightly and monthly.
For daily, weekly, fortnightly and monthly the Next activation box will appear with a dropdown calendar where you can set the actual date and time to process the next trigger.
There is a field for attaching an enclosure. The most common enclosures include incremental spreadsheet updates and media files, but you can also choose PDFs, Word documents, Excel etc.
The Active/Inactive radio buttons denote whether the trigger is on or off.
When completed click on the Update button to save the trigger.
Trigger type: Autoapprove #
Automatically sets the response to approved (once all the images are submitted). This works as an instant trigger only. This feature is available to Premium users only.
Trigger Rules #
You can set rules if you only want to be informed by trigger for certain responses. Just tick the form on the right hand side, then mouseover and click on the lightning icon 
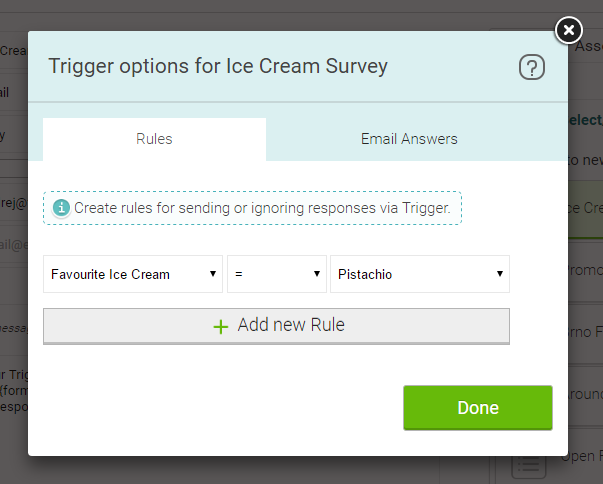
Select the question, then set the condition and the value.
There are many different filter conditions that you can apply.
Some examples are: empty, not empty, equal and not equal.
For text questions you can also use the filter to check if it contains text.
Some conditional examples include:
Empty - No answer received
Not empty - Answer received
= (Equal) - If the answer is the same as your specified value (used for dropdowns, single answer, multiple answer)
!= (Not equal) - If the answer is different to your specified value.
For Dropdown, Single answer, Multiple answers components, you can choose the values from the dropdown.
For numbers, you can also compare by greater than and lower than.
You can easily add an additional question by clicking to Add new Rule.
When you have multiple questions, you can specify whether the trigger will be sent when any or at least one of the rules are met.
For example: If you want to receive emails only when the user chooses a specific flavour of ice cream “Pistachio”, then set the following: Question: Favourite ice cream, Condition: Equal, Value: Pistachio
When a trigger is processed #
Before they are activated, Triggers are always waiting for all associated files to be uploaded to the admin account. However, if the delay is in excess of 24 hours, the trigger will process anyway. You will be notified within the trigger email if there are any files missing.
Trigger Email answers #
When you are receiving trigger emails and you want to see certain answers directly in the email content, you can specify the answers in the Email answers tab.
Just choose the form on the right hand side, then mouseover, click on the lightning icon and click to the second tab called Email Answers.
Here you can specify which answers you want to display directly in the content of the email.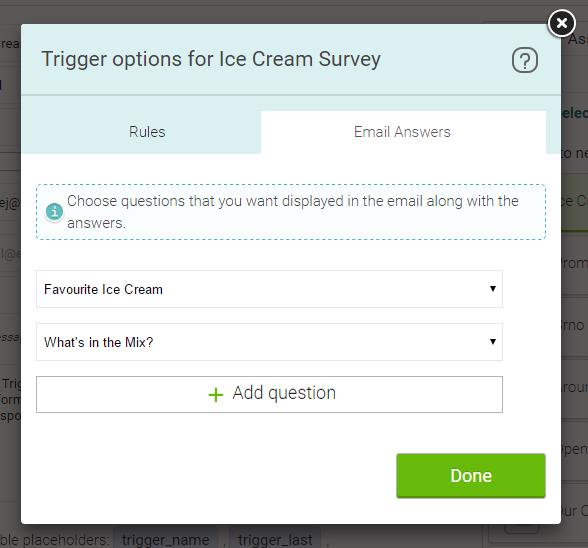
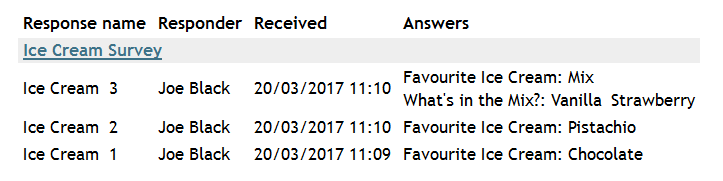
This is how you might see it on the email notification:
Trigger options subscription summary #
- Free - No Triggers available.
- Standard - Allows daily, weekly, fortnightly & monthly triggers including standard exports.
- Advanced - Allows standard subscription options as well as hourly triggers, Also provides advanced email export options + Google Drive, Google sheets, Dropbox.
- Premium - Allows the use of Webhooks, Autoapprove and Instant triggers.
Some trigger types might be available to Standard & Advanced subscription types as a separate paid monthly module (eg: Instant Triggers, Google Drive, Dropbox, Microsoft). See pricing page for more details.