Please note: Access to the Custom DB is available to Premium clients or as an additional paid module for non Premium subscribers.
Custom DB allows you to prefill your own internal data into your NestForms responses.
We have many clients using this feature in many different ways. As an example, consider product catalogues, visiting locations that requires extra associated data, regular site visits, linking inventory with QR codes, recording timesheets with QR codes etc.
To get started, you can import an Excel document into NestForms Custom DB. Then choose which columns to show for each form component, when using the Form builder.
We currently support a custom DB containing the following components:
- Dropdown
- Text field
- Number
- Barcode & QR code
Managing your Custom DB #
You can add/edit/delete rows directly in NestForms. However, you will need to import your first set of data via the Excel file to set the initial structure - see the import process below.
You can also use search to filter the results you are looking for.
Import Process #
You can start on the following URL: https://www.nestforms.com/customdb
First you need to import an Excel document, we also support a range of file types that can be imported, including xls, xlsx, csv and others.
Then you can choose to import into a new or existing table.
The import allows you to apply some magic within the fields you have in the document. You can choose a field as a link to your relations, so the group (row) is linked to the members specified in that field (if they are an active relation). If you want to share one group with multiple relations, just separate them by a comma in your import file.
The system checks the field special values before you import the document, so you can correct any issues if they arise.
After you import your data, you can continue editing your form.
When you have set Member Reference Codes for your relations, you can then apply this code into a column within your Custom DB import file. And if you select the column type Member Reference Code, then each row will be assigned to a specific relation based on the code in the Excel sheet you are importing. This can be useful while using NestForms as a Quality Control checklist app where you have many people inspecting the same products at different locations.
Update the Form Builder #
On the form builder, the dropdowns will now have a new checkbox, Custom DB, which when checked, will show the Custom DB dropdown which allows you to select which columns should appear in the form field.

Don't forget to share the form with all responders collecting data. If you have any members selected within the Custom DB, but not in the form share, a warning message will be displayed.
In the App #
In the app, you will have a new menu item on the left Search Custom DB, which will show you the master groups for each form you are assigned to (the owners will see all of their data). When you choose a group and create a response, the data will be prefilled into it.
The data can also be prefilled using the standard form filling method, so after you open a new response, the dropdown (radio or checkbox) will have the options available and will work the same way as on the Search page.
You can also choose the item GPS position - this means that when using the app the location will be displayed on the map within the Custom DB page.
Modes of usage #
1) Custom DB rows are shared with all your colleagues (that have the form shared with them) They will receive all Custom DB rows and they will be able to start a response based on the Custom DB data.
2) Custom DB rows are specific to the relation - each colleague will receive only rows that are specifically linked to them. If you login to the app with the master account details, you will see all the rows for testing purposes.
Sort Custom DB by numbers #
By Default the Custom DB rows are ordered alphabetically, But if you have a number column, it’s better to sort Numerically,
Sorting numbers alphabetically can lead to unexpected results. For example, 12, 5, and 1 sorted alphabetically would be 1, 12, 5. This is because alphabetical sorting treats numbers as text. Sorting them numerically yields the expected order: 1, 5, 12.
Only unique #
This feature is useful when you have one Custom DB used for different purposes. And for one purpose, you want to display only grouped data.
For example - In one form, you might want to have a detailed selection of the specific address. And in the second form, you want to select only street names. So in the second form, you simply pick in the dropdown component the street column from Custom DB and then tick the “Only unique” option.
As a result, in the app, you will have a simplified list with streets from your Custom DB where each name is listed only once.
Keep Options #
There is a checkbox we call Keep Options which is available for single answer, multiple answer and dropdown component types linked to your Custom DB.
When the keep option is ticked, it means that when a responder is filling in a response, options listed within the component will be displayed.
The main use would be when you have a custom DB row, but in some answers you need to select from a specific set of values.
The big advantage when using Keep Options is that you can also assign Skip logic to these options and hide other questions that are no longer needed. So in this way you can specify which questions are to be selected for the specific custom DB rows.
To use a client scenario: When you have a custom DB containing client addresses for the inspection of air conditioners.
You can add a Single answer question, for example “Manufacturer” which will contain options that you can select that include “Toshiba” Mastertherm etc. and when you select the address, the manufacturer will then display as prefilled within your Custom DB.
You can also add another Text question like “Toshiba model”, but using Skip logic to display this question only for Toshiba manufacturers.
So if you pick the location with Toshiba, the “Toshiba manufacturer” questions will appear, but if you pick the location with another manufacturer, the “Toshiba manufacturer” will be hidden.
Updating your Custom DB data #
If you want to update your Custom DB from an Excel file, you can upload as many times as you need (eg update once a day if required). This is possible but please take note of the following precautions:
- Keep the same structure of the uploaded file (same amount of columns, same identifying name of the columns in the first row)
- You will need to have one column in the file that contains a Unique ID field (Eg system number, email address, client id etc), you will need to make sure that this is always entered within each row. You also need to set this column as a Unique Value in NestForms.
Then when you upload a new file, NestForms will merge the new data with your existing data. In this case only modified items will be synchronised into the apps.
Please note: The text field also allows you to update your data to be exported back to your system.
Increasing and decreasing numbers
When using the Number component there is a feature allowing you to update any numerical data in your Custom DB table.
Once you have added the Number component and checked Custom DB, within the Type field dropdown you have the option to override, decrease or increase the numerical value.
When any Response is approved the number in the Custom DB will be increased (or decreased based on your selection in form builder) instead of overwritten.
This might be useful when you need to change numerical data within an inventory when the amounts of specific items have changed.
Connecting Custom DB to Barcode or QR code #
Most barcodes are numerical. So if you have an ID number in your custom DB as a column, you can add the Barcode and QR code question to your form. Tick the Custom DB checkbox and choose the related column in the Custom DB dropdown.
You should then add another Edit field and link it to Custom DB (to another column - eg Name).
Then when you scan the barcode within your app, the name will automatically prefill.
You can add multiple fields into the form based on the data you have in your Custom DB (serial number, type of device, number of devices).
The same principle can be applied for QR codes. The only difference is that you need to decide which type of QR code you are using. For example, you can use a Link type (you need to have the exact link in the related column in your Custom DB) or you can use text (where the exact text is in the related column within your Custom DB).
Generating QR codes using Custom DB #
You may wish to generate QR codes for many reasons, for example, If you are working with inventory or within warehouse management. There are many other reasons to generate QR codes, to provide location details or directing people to websites etc.
NestForms allows you to generate QR codes by assigning a unique identifier code, created in a column within your Custom DB table.
Let's say you call the table column ‘ID’ or ‘Unique ID’, you can then assign unique identifying numbers, text, location details or web addresses etc to various items or assets within this column for each row within the table. Essentially linking them up to the generated QR code.
To generate your QR codes you should follow these steps:
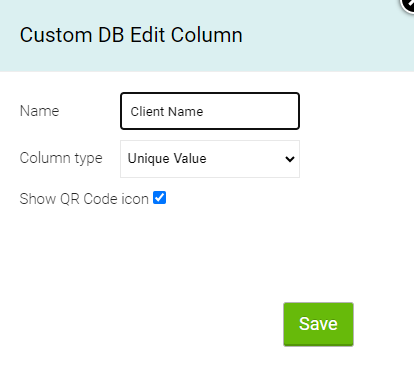
When you mouse over any of the column headings within the table, you will see an option to edit the column. When you select editing mode, a popup appears with three fields:

Name: Give the column a title.
Column type: From the dropdown menu select the ‘Unique Value’ option.
Show QR code icon: You should check this box to enable the QR code icon. After you have pressed Save, when you hover over the column headings again, this time the QR icon appears beside the editing pencil icon.
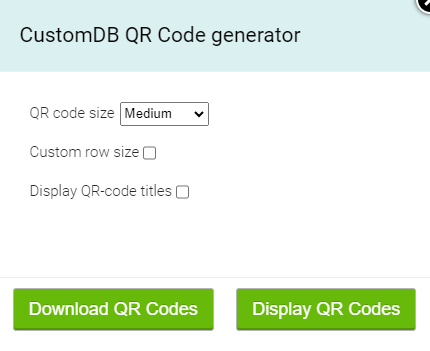
After clicking the QR code icon, another popup appears with the following options:

QR code size: The options are small, medium, large and extra large.
Custom row size: You can customise how The QR codes appear before distribution or printing off. By checking this box you can select the number of codes that will appear on each row. For large and extra large this option is unavailable. You might wish to use this feature for Custom PDF printouts etc.
Display QR code titles: You can choose an option from the other column headings from which you want to generate the QR code. So even though the ID will be coded into the QR Code, the location can also be printed below the QR Code.
You will see two green buttons to allow you to download or display the codes. When you download they will simply be downloaded within a zip file as images.
You can now print off the codes (as stickers etc) with the unique identifier data and assign/display them on items, assets or perhaps at locations etc.
Once the code is scanned within the NestForms app on the mobile device you will then see the relevant information assigned to the code.
Example #
You need to send one responder to four different locations. You can create a form, link it to the custom DB and share the form with the responder. Then you create four custom DB records that the responder should visit and are linked to them.
Once completed, the responder will see a new tab in the app menu called Custom DB. Here, the four locations will appear that the responder is required to visit.
You can have different places linked for different responders, ensuring that each responder will see only the places they need to visit.
We have clients using this for product catalogues, visiting locations that require extra associated data, regular site visits, linking inventory with QR codes, recording timesheets with QR codes etc..
You can also see how this works when you login as a guest into the Android app.
Here you can find a simple example to start with:
Import the custom db example file into the Custom DB in your account. Then import the form definition example into your forms. Within the form - you can make edits into the required fields - tick the Custom DB and choose the correct item from the Dropdown.
You can then share your results with your colleagues and see how it works within the app.
Custom DB support updates via the API - see more on the API help page.
Note: Custom DB is currently not available on the online form fill page.
Custom DB Merge with Responses #
It is possible to update responses based on data supplied using the Custom DB table.
This allows you to update your responses with data external to the Nestforms service. This is useful for synchronisation with other services.
Use case: You forgot to add an item into the Custom DB originally and you need to assign it once all the responses are already collected.
To update the responses, first create the form and upload some responses, you can find an example at Customdb Merge Form Example.xlsx - see Help - Excel form import.
After you have collected your responses and want to update them, upload the Custom DB Table to nestforms.com, an example can be found here: Customdb Merge Example.xlsx. This table does not need to be in any prior relation to the form on nestforms.com for this to work.
After this step, go back to the Custom DB table and click Merge with Form and select the correct form with which you want to merge.
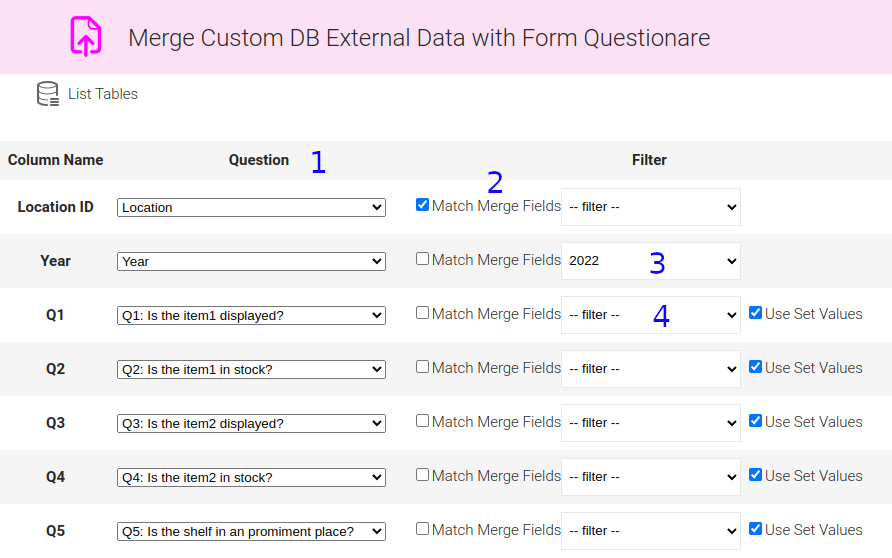
To properly join the data, you need to configure the merge.
A table will appear, allowing you to select which table column matches which field in the form. This is done in the Question column (1). For columns used to match a Table group to a response the ‘Match Merge Fields’ (2) checkbox should be ticked (ie. a unique field - in the example the Location ID / Location field). You can use those fields (3) to filter the data (using the dropdown, in the example it is the Year field), in case the dropdown stays empty (4), the values within those fields in the responses will be updated using the data from the Custom DB Table (in the example, all the Q fields). So in case the value within the response is different from the value in the Custom DB Table, the response will be updated with the new value from the Custom DB Table, this will also mark the value as changed in the response. The data can also be merged based on the Set Value specified on the dropdown/radio/checkboxes in the form (in the example, it is all the Q fields again).

In case you update a table previously used for merge, some of the values (Field mapping dropdown, Match Merge Fields and Use calculated value checkboxes) will be remembered for the next merge. The filter values are not being remembered as the filter tends to change for each merge.
The last step shows what will be updated (confirms the data makes sense, based on the filter and on the Match Merge fields selected) and lets you import the data to the responses.


