If you already have forms or would prefer to create your forms in Excel, it is possible to create a form in Excel and then import that file into NestForms.
Important note. This is not about importing your form Responses, but this page is about importing the form structure that you have created within Excel with all the required questions for your form.
Start here: https://www.nestforms.com/form-excel-import, Download our sample template, make any edits you require and then upload it again.
Remember you must follow the same format in the sample template we have provided. The template document is a simple example showing you how to create each type of field
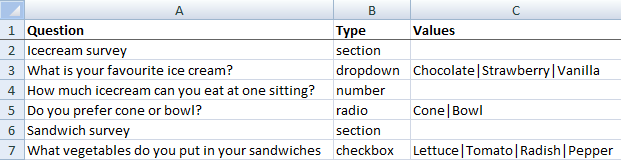
Remember there should always be Three columns only
First Column: Questions - The text of your question
Second Column: Component Type - you must choose one of the component types in the available dropdown (edit, dropdown, number, GPS, etc.).
Third Column: Values - some component types may require additional information - eg dropdowns, radio or checkboxes.
Values can be separated by the symbol “|” with no spaces
For example:
Single answer question (Radio button) Yes|No
Multiple answer question (check box) Lettuce|Tomato|Radish|Pepper
Dropdown Strawberry|Vanilla|Chocolate
Also make sure that your form is contained within the first sheet of the Excel file.
If you have forgotten something, don’t worry. Once your form is imported, you will be able to add other fields to the form later on within our website form builder.
If you already have a form in the NestForms builder and you just want to make a copy, you can use the Save as new feature. Or, if you want to clone your existing form into another account, use clone form feature.
Importing forms including skip logic #
There is a more enhanced format you can apply if you want to import a form that includes Skip Logic.
This enhanced format might not be for everyone as it requires some programming knowledge.
When using this format we would strongly recommend importing the form without Skip logic. You can add Skip logic into your form within the NestForms form builder.
For those that are comfortable with JSON, you would need to change the Value column from the pipe (|) separated string to a structured JSON format that contains an object with one item called items, where items are an array of objects. Each of these objects contain a name with the name of the item and might contain Opts as additional options. Want to learn more about JSON format.
Opts are objects that might contain one of the following keys:
- conditional which is an array of strings containing the IDs entered in the ID column. In simple terms, it might look like this:
{"items":[{"name":"Chocolate", "opts":{"conditional":["howMuchChocolate"]}}, {"name":"Strawberry"},{"name":"Vanilla"}]}
- calculated_value with the calculated values for the relevant item. e.g: "opts":{"calculated_value":10}.
You can download a sample XLS file on the form import page with skip logic.
There are other options available that accommodate different component types, see the enhanced example for more details. Let us know if you would like to see more options available to meet your import needs.
Additional options #
If you want to set one of the values as required, you can add {"required":1} into the values. If you need to combine this with other values, an extended format is necessary.
There are also other options that might be useful, which can be found in the “enhanced template with Skip Logic” Excel file.
For example if you need to have the Feature button with the clone section option, you can simply add the finish_button type with the following values: {"type":"clone_section"}