By creating your profile on NestForms you are provided with a portion of free cloud storage. Your Cloud storage is where all your survey data is uploaded e.g. Photos, Audio Files, Signatures etc.
In terms of allowance:
Free accounts are provided with 80MB
Standard accounts are provided with a much bigger portion of 750MB
Advanced accounts get a chunky 2GB
and
Premium accounts get a whopping 10GB
We have found that these options are sufficient for most of our clients, however if you would like a little more room to manoeuvre there are other options for Advanced and Premium subscriptions explained further within the page.
Increasing your storage above your default plan limit #
For Advanced and Premium users we do not limit the amount of survey forms or responses received, this help page refers only to file attachment storage.
As an Advanced or Premium user you are provided with a more comprehensive range of options regarding your plan limits. One of them is buying extra storage when needed. NestForms will offer you these options when the situation arises.
By activating the Dynamic Storage Increase you’ll be allowed to upload any amount of data you need because your storage will automatically increase to fit the exact amount of data uploaded.
For invoicing purposes, you are always charged based on the maximum storage within the relevant monthly period.
For clients that use up to 250 GB of data above their allowance, the cost is charged at 1€ per GB per month. If you are in excess of this limit, then the cost per additional GB is reduced - Learn more in the Increased Limits Pricing section.
Increased Storage Pricing #
| Storage | Pricing per Month |
|---|---|
| First 250 GB | €1.00 per GB |
| Next 500 GB | €0.75 per GB |
| Anything over 750 GB | €0.50 per GB |
Activating Dynamic Storage #
Storage increases will be offered to you in two scenarios.
- When you are about to reach your plan limit, an option of increasing your storage will be offered to you through the Account Details panel on your Dashboard. The panel will adjust and the Upgrade button will appear at the bottom of the Account Details panel.

- When you have uploaded files that are in excess of your subscription limit. NestForms won’t erase these files but will block them from view or manipulation until your storage limit is resolved.
This part is important to know because instead of viewing these files, an image reading STORAGE EXCEEDED will show instead. If you mouse over these images, they will show the INCREASE LIMIT button.
The buttons INCREASE LIMIT and Upgrade will both take you to a window presenting you with two options for increasing your storage.
The first option is to upgrade your plan (this option won’t be presented if you are already a Premium user).
The second option presented is to activate the Dynamic Storage increase.

For example, if you have been using an extra 12GB of storage for two weeks but then delete 4GB of files in the following week, which means you have only 8GB above the default limit then, you will still be billed for 12GB. However, the next month, you will be charged for 8GB based on your previous 4 GB deletion.
However, once you remove the excess files and remain under the GB allowance of your subscription for the following month, you will be charged at the normal rate.
So to summarise: You are billed every month at the maximum storage use for that month if there was any usage above the default limit of your subscription..
We prepared Dynamic Storage to work in this way so you’ll never have to worry about dealing with exceeding your limits.
Tips on managing your file storage #
If you are trying to reduce your storage on NestForms, you will need to export any responses that contain files that you either consider no longer required or obsolete. You can then delete these responses from NestForms. In order to carry out this process there are certain steps to consider that can assist you in managing your file storage.
It is not possible to bulk download all forms at the same time. You must export all responses on a per form basis. In order to do this you will need to bulk download your responses first. You can do this in different format types depending on your preference.
Once you have done this, you can permanently delete the old responses, see the deleting-responses help page for more details.
If you wish to externally log all data that is received automatically from your colleagues responding to your forms, then the best option is to use Triggers. Learn more about Triggers & Webhooks
If you need to update the data as an administrator online within your NestForms master account or if you need to separate Approved responses from Rejected, then you should only export the data when you believe it has been checked and ready to be exported.
This export depends on your requirements. Depending on your platform preference, there are multiple options that will allow you to export your data from NestForms. For example, if you want to export your data from NestForms to Microsoft OneDrive or Sharepoint, NestForms gives you the facility to export the files first then followed by an Excel export, the links to images will use the Microsoft image links also. This process is very similar to Google Drive & Dropbox also.
If you want to export PDF files to your Cloud storage as well, you can do it automatically via Triggers. If you want to upload only approved responses, you would have to download them manually and then upload to your Sharepoint account.
Alternatively, you can also use the Public NestForms API to export all your data to any external system or database you wish.
If you want to maintain records in Nestforms, then the related files need to be stored within the platform as well. So if you want to decrease your storage payments, you will need to delete older or less important responses from your account (make sure you have exported them prior to deletion).
Finally, remember that all the storage is related to your images, signatures and audio files. The text data contained within a response is not considered within your storage limits.
Cleaning out the Storage #
When you go over your storage limit you might want to explore where the largest amount of data lies among your forms.
With that thought in mind, we have included a Display option to assist you.
The Display option is located within the Forms list page and allows you to view the total amount of storage used for each form.
In the menu of the Forms list you'll find the Display option![]()
Once you mouse over Display, the following options are presented to you: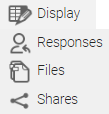
Responses is set as the default option. You can see in the two right hand columns any responses waiting For approval and the Total number of responses.
When you select Files the two right hand columns will change to File storage and File count. Here you can view the exact amount of storage used and number files within each response.
There is a further option where you can view the amount of Shares per form in a single column on the right.
Remember that within any subscription you have the option to delete any superfluous responses. There is a 14 day spell where you can recover this data. You will not be able to recover any deleted responses after this period has elapsed.