Most export options are available to Advanced & Premium subscriptions, or as a separate paid module.
There are various options to allow you to work with your data outside of the NestForms platform. You can also create a historical backup of your data. You can export your data through the following formats: Excel, PDF, Word, Images ZIP file, Charts or external services like Google Drive, Google Spreadsheet, DropBox, Microsoft OneDrive or Microsoft SharePoint.
Remember to approve your responses before you export your data!
How do I approve responses?
In order to Export your Responses, just go into the Form Responses page, mouseover the Export heading, and you will see the menu options below. Then choose your preferred option depending on whether you are exporting data or files associated with the responses.
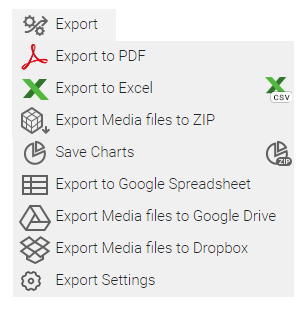
Below we have summarised the most used and requested export options available to you. Our goal is to give you a brief overview of what is available to you and how to perform the export itself.
Downloading all responses to Excel #

Just mouseover Export at the top of your list of survey forms when viewing your responses, and select Export to Excel. Your browser will then begin to download the exported spreadsheet of responses based on your current filter.
Please find a sample Excel export file that will show you the basic structure of your Excel export. Each response is on a per line basis. The structure will obviously vary depending on the name and number of fields within your form. You can download either an xlsx or cvs file.
We also have a fully customisable Multi-row Excel export option.
Downloading all responses to PDF #

In the same way, mouseover Export at the top of your list of survey forms when viewing your responses, and select Export to PDF. Your browser will then begin to download the PDF document of all Responses based on the current filter. See our PDF example export file.
If you wish to have each response on a separate page you can do so by selecting PDF settings ![]() on Export to PDF item in the menu. This will open a window where you set these changes by checking the box Always start a response on a new page.
on Export to PDF item in the menu. This will open a window where you set these changes by checking the box Always start a response on a new page.
It is also possible to export a single response by mousing over the required response and then clicking on the PDF icon. NestForms also supports fully customised PDF exports.
Advanced and Premium subscribers have the option of adding a logo or branding to their exported PDF files as part of their subscription. Premium users are allowed to remove the NestForms logo from their files entirely. Standard and Advanced subscribers can also remove the NestForms logo if they subscribe to the Fully customised PDF paid module.
Downloading one response to Word #

By mousing over your responses individually, you have the option to download the individual response as a word document. See our word export example.
We can also customise this export for you if you are on either the Advanced or Premium subscription plans.
You can also include a specific header logo in the word export. Just set your Company logo or Brand image on your profile page or the Brand image used on the form and it will appear within the export.
The logos have the same format and restrictions as for PDF exports (eg. same positioning).
You can also hide the export title from the Word export using the Word export settings in the Export submenu on the Reports page.
Downloading all images and other file types in bulk as a zip file #

This Export option enables you to save all of your images or audio files within separate Zip files, this can be used if you simply want to backup your files or pass the data to a client.
If you want to download images in bulk, you can just go to reports (use the filter option if required) and then mouseover Export and click to Export Media Files to ZIP. This will download all the images in a zip file. All images are then placed within the directories named based on the response name.
Downloading your Survey Charts #
As an HTML file
If you want to save the survey charts as a separate HTML file, mouseover Export and click on the left hand side icon Save charts as HTML.
As a Zip file
Downloading your Charts as a ZIP file means you receive the files as separate images allowing you the freedom to manage the charts as you see fit. From the dropdown Export menu click on the save charts as Zip icon on the right hand side of the Save charts option.
Exporting responses to Google Sheets #
You just need to authenticate your account first.
Then when you run the export, all approved data will be transferred into Google Sheets within your Google account under the Survey form name.
You can run this export incrementally - each following export will add missing responses to your existing spreadsheet. See more on incremental updates.

Exporting images to Google Drive #
You just need to authenticate your account first.
Now you can run an export. All images will be exported into your Google Drive account. They will be ordered into separate folders in the following format:
NestForms > Form name > Event name > files

Exporting images to DropBox #
You just need to authenticate your account first.
Now when you run an export, all images will be transferred into your DropBox account. They will be ordered into separate folders in the following format:
NestForms > Form name > Event name > files
For your own security, NestForms will be able to access only files within the NestForms directory and no other files in your account.
Exporting to Microsoft Excel OneDrive or SharePoint #
You just need to authenticate your account first.
Then when you run the export, all approved data will be transferred into an Excel sheet within your Microsoft account under the Survey form name.
If you have a SharePoint Account, you will also see an export option to Excel in SharePoint. All data will be exported to your default SharePoint account.
You can run this export incrementally - each following export will add missing responses to your existing spreadsheet. See more on incremental updates.
Exporting images to Microsoft OneDrive or SharePoint #
You just need to authenticate your account first.
Then you can run an export. All images will be exported into your Microsoft One Drive account. They will be ordered into separate folders in the following format:
NestForms > Form name > Event name > files
If you have a SharePoint Account, you will also see an export option for media files to SharePoint. All data will be exported to your default SharePoint account.
Only images within approved and pending responses will be exported.
Third party authentication #
When exporting to a third party service, you will always need to authenticate your third party account in order to be able to send exports.
This process is very simple, just go to your profile page in NestForms, scroll down to Other features, you will find different options available to you for connecting with Google, Dropbox or Microsoft. Just click to the Authenticate link in order to connect NestForms with the service. You will then be redirected to the third party website. If you are not logged in to the third party website within the same browser, you will be asked to login. Then you will need to confirm the permissions that NestForms requires in order to proceed with your exports. When all is processed successfully, you will be returned to NestForms and will see Already authenticated beside the selected service. Now you’re connected!
You can also revoke the NestForms permission at any time by clicking to Revoke Authentication which will remove the connection to your profile. This has no effect on data that was already exported to your Third party account. Then you can Authenticate again and connect via another account.
How NestForms manages incremental updates #
If you run a manual export on the responses page - NestForms checks what responses you want to export, then checks which responses were already exported (these are ignored) and we then add new lines for each missing response.
Triggers - when there is a trigger, NestForms only processes new responses, so each new response is simply added to the end of the spreadsheet.
NestForms will create a new document when one of the following scenarios occurs (otherwise it will continue with incremental updates):
- The Export document is missing.
- Change the Form name in NestForms form builder.
- Change the Google Sheet name within the Cloud platform.
- Moving the document into a different folder within the Cloud platform.
You are free to update anything inside the questions, options, sections, etc.
When there is a new question added in the NestForms form builder, NestForms will then notice that this is missing in the spreadsheet and add this when required by export.
Please be careful when changing the format of the first sheet in the document. Keep the first two columns as they are. Do not change the name of the columns in the first row as they might not be recognised in the follow up export. You can rearrange whole columns and rows. When adding your own column, always put the name to the top row.
How do I approve responses #
You need to check that your responses are approved before you export them.
If there are a lot of responses and you are happy to approve them all without checking the content, you can bulk approve all responses on the responses page, by mousing over Form actions & click on Approve all ![]() .
.
Otherwise, you can click on the approve icon beside each Response -  .
.
 If you have made a mistake, you can click to the approve or reject icon by using the right button on your mouse, you will see a popup menu where you can reverse your decision.